Enterprise Studio manages a wide range of objects, relationships, folders, and models. Each type of element has a considerable number of properties, which are applicable to various things, such as analyzing the graphical appearance. Moreover, this set of properties can vary.
The Properties pane is one of the components in Enterprise Studio used to set an element's properties. An element's properties and attributes can be viewed and edited within this interface. Others include the Property table and Properties form (ArchiMate elements only).
Properties pane
By default, the Properties pane is shown at the bottom left of the application window. If it is not visible, you can make it visible by selecting the Properties checkbox in the Tool Pane group on the Window ribbon tab or pressing Alt+Enter.
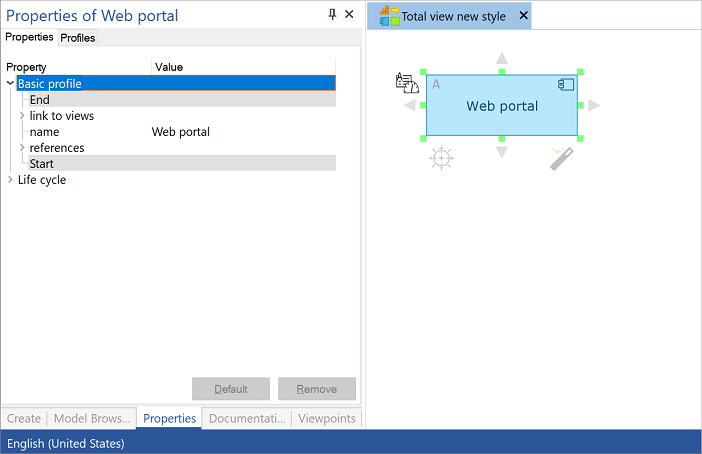
The Properties pane displays the properties of an object or group of objects currently selected in the user interface, such as in the model browser or in a diagram or view.
You can access the Properties pane of an object or relation by selecting the object or relation in the diagram, view, or model browser and then clicking the Properties pane.

|
It is not necessary to close the Properties pane every time you make a change. When selecting another object, you can change its properties in the same window. |
The Properties pane divides the properties into tabs: Properties and Profiles. For Amber models, there is an additional Attributes tab.
On this page:
The basic properties of the selected object or objects are located on the Properties tab. Here you can both view the properties and assign values to them. The values of the properties can be entered in different ways, depending on the property type. For some properties, you can type a value; for other properties, you select a value from a list. For yet other properties, you select them or add a check mark to (de)activate a property.
Entering values can usually be done in two ways. If you click once in the text box or on the text (Double-)click to add next to the property, you can directly type a value, or select a value from a list that appears. If you double-click, a pop-up window will appear, allowing you to type or select the data.
In some situations, after double-clicking, a separate window with a hierarchical list will appear in which you need to look up the desired value. To do this, you can browse the list, but you can also search for a value using the search box at the top of the list. Using the search box is particularly useful for large models. The type of data shown in the hierarchical list depends on the type of data you need to enter for the property.
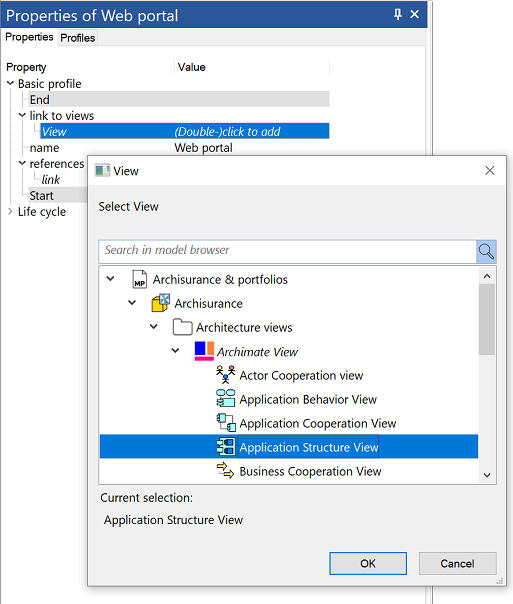
Hierarchical list for selecting a view for the property "link to views".
Just click in the search box and type the word you are looking for. The results will automatically be highlighted in the window. The procedure is identical to searching in the model browser.
By clicking the cross sign next to the search box, you can remove the search term, and the complete list structure will be shown again.
The OK button is only active if a value of the correct type is selected.
|
|
You can also add properties using the table input, see Tables in Enterprise Studio. |
A small block with a plus sign can be expanded. The same holds for lists. In such cases, all elements in the list are displayed. You can remove an element from a list by clicking the Remove button at the bottom of the Properties pane.
|
|
Double-clicking a text box opens the text editor. This helps you add more than one line of text. You can type the text directly in the box by clicking twice with a short interval. Line breaks are added with Ctrl+Enter. |
Properties can be of type generated. A property of type generated is displayed in italics on the Properties tab. A property of type generated can be used to have an object take over a value from (one of) its child objects; its value is, as it were, "generated" from the child objects. If an object does not have its own value for the property, then all child objects (hierarchical lower objects) are searched for a value and added to the object. However, if you change the value for the object itself, then any "generated" values already available on the object are now considered the object's own and no longer generated. There is no longer a dependency on the child objects. The property is also no longer displayed in italics. If you want to make the value generated again from a child parent object, select the property, and click Default on the Properties tab.
Properties can be inherited when defined as such in the Metamodeler. A property of type inherited can be used to have an object inherit a value from (one of) its parent object(s). If an object does not have its own value for the property, then all parent objects (hierarchical higher objects) are searched for a value. However, if you change the value for the object itself, then the value will no longer be inherited from the parent objects. Moreover, the child objects of the object that has its own value will now inherit this new value from their parent object. If you want to inherit the value again from a parent object, select the property, and click Default on the Properties tab. A property that is defined as inherited is displayed in italics on the Properties tab.
Sometimes, properties on the Properties tab are displayed in a gray bar. These properties are read-only and cannot be changed.
Once a property value has been changed, whether being added/activated or removed/deactivated again, it is considered "touched". This can have consequences for operations that utilize a property value, such as reporting or excluding objects from matching. Once a property has been "touched", it becomes relevant for the operation. For reporting purposes, it means that the property, with its current value, will be included, whether it is activated or not. The same applies to excluding from object matching: once the property for excluding has been (de)activated it will have a different impact on the exclusion configuration.
The only way to restore an object property to its default value is by selecting the respective property in the Properties pane and then clicking Default at the bottom of the window.
For some properties, it is possible to add multiple values. An example is the property "link to views" on an ArchiMate object. Multiple values can be added to this property. To remove one or more values from a property, select a value of the respective property in the Properties pane, and then click Remove at the bottom of the window.
A profile defines a set of object properties. Once an object is assigned a profile, values can be assigned to the properties of that object, as defined by the profile. Besides the default profile (Basic profile), which is assigned to all elements (with properties such as name), you can add additional profiles. This enables the assignment of specific properties to elements, such as those required for a particular analysis. Additional profiles are located on the Profiles tab of the Properties pane. There, they can be assigned to the object. The Properties tab then shows the properties grouped per assigned profile. By clicking the plus sign next to a profile name, you can view the properties included in that profile.
In Enterprise Studio, it is also possible to define and use your own profiles using the Metamodeler. This way, you can add new properties yourself. Custom profiles will appear in reports in the same manner as standard profiles. Alternatively, you can use data blocks to create your own sets of attributes.

|
This functionality only applies to Amber models. |
Attributes play an important role in modeling and analyzing data-intensive business processes. Attributes are properties of items and (inter)actions that display (dynamically determined) facts about items and actions.
The item and attribute language provides structure for items and attributes to be used for calculations. It is available for creating scripts, conditions, and definitions. These can be defined on the Attributes tab of the Properties pane.
It is possible to generate a color view or label view directly on an element property via the Properties pane. To do this, right-click a property and then select Color view or Label view. Make sure that the view the respective element is in is open.

Example of a color view generated on the property "Asset" of the application process element